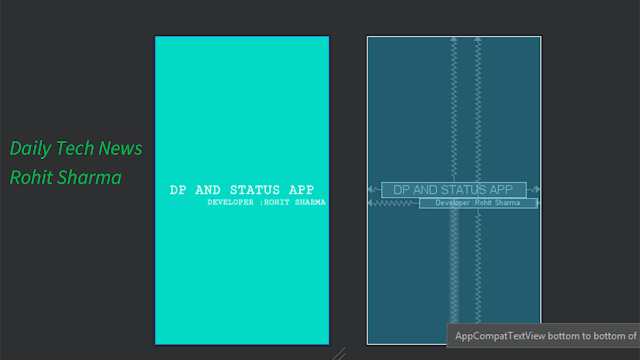
Today I Discuss the How to Create Splash Screen in Android Studio || Daily Tech News.
Android Studio- Splash Screen:- that means any application in android first screen is called Splash Screen.
first Create Project and Write Design Code.
<?xml version="1.0" encoding="utf-8"?>
<androidx.constraintlayout.widget.ConstraintLayout
    xmlns:android="http://schemas.android.com/apk/res/android"
    xmlns:app="http://schemas.android.com/apk/res-auto"
    xmlns:tools="http://schemas.android.com/tools"
    android:layout_width="match_parent"
    android:layout_height="match_parent"
    tools:context=".MainActivity"
    android:background="@color/colorAccent"
    >

    <TextView
        android:layout_width="wrap_content"
        android:layout_height="wrap_content"
        android:text="DP AND STATUS APP"
        android:textStyle="bold"
        android:textAlignment="center"
        android:fontFamily="serif-monospace"
        android:textSize="33sp"
        android:textColor="#fff"
        app:layout_constraintBottom_toBottomOf="parent"
        app:layout_constraintLeft_toLeftOf="parent"
        app:layout_constraintRight_toRightOf="parent"
        app:layout_constraintTop_toTopOf="parent" />

    <TextView
        android:layout_width="wrap_content"
        android:layout_height="wrap_content"
        android:fontFamily="serif-monospace"
        android:text="Developer :Rohit Sharma"
        android:textAlignment="center"
        android:textAllCaps="true"
        android:textColor="#fff"
        android:textSize="20sp"
        android:textStyle="bold"
        app:layout_constraintBottom_toBottomOf="parent"
        app:layout_constraintHorizontal_bias="0.946"
        app:layout_constraintLeft_toLeftOf="parent"
        app:layout_constraintRight_toRightOf="parent"
        app:layout_constraintTop_toTopOf="parent"
        app:layout_constraintVertical_bias="0.541" />

</androidx.constraintlayout.widget.ConstraintLayout>
And Java File Code
package com.rohit_sharma.dp_status;
import androidx.appcompat.app.AppCompatActivity;
import android.content.Intent;
import android.os.Bundle;
import android.os.Handler;
import android.view.WindowManager;
public class MainActivity extends AppCompatActivity {
private static int SPLASH_SCREEN_TIME_OUT=2000;
@Override
protected void onCreate(Bundle savedInstanceState) {
super.onCreate(savedInstanceState);
getWindow().setFlags(WindowManager.LayoutParams.FLAG_FULLSCREEN,WindowManager.LayoutParams.FLAG_FULLSCREEN);
setContentView(R.layout.activity_main);
new Handler().postDelayed(new Runnable() {
@Override
public void run() {
Intent i=new Intent(getApplicationContext(),Home.class);// Home Activity Create
startActivity(i);
finish();
}
},SPLASH_SCREEN_TIME_OUT);
}
}
DEMO HERE:-
THANK YOU !!!

.png)


1 Comments
Behatreen blog rohit .....it helps me a lot and making my understanding level up
ReplyDeletethanks for your suggestion and improving quality of the content